Guide to Zoom Security Settings
Security Step #1: Setting Up Your Meeting
Set up Registration
To enable registration, visit the Zoom web portal, and use the Meetings menu. When scheduling or editing a meeting, select the registration required check box. See more details on setting up registration for your meeting.
Create a Passcode
To enable a passcode, visit the Zoom web portal, and use the Settings menu. Select the Security section to verify the passcode settings. Share the passcode only with the people you’ve invited. See more details about using passcodes.
Use Zoom webinar to limit interaction options
If you are hosting a virtual gathering that is open to people outside the U of T community, you can consider hosting a Zoom webinar instead. This limits participants’ interactions to the chat function.
Never post Zoom links to Social Media.
We know it’s tempting to share your Zoom event link on social media. But did you know that the word “Zoom” and Zoom links are trolled by bots on social media? Meetings shared this way become targets for disruptions and nuisance. It’s like advertising a house party when you only meant to invite your closest friends to dinner.
This is why it’s really important to set up Registration for advertised events, so only welcome guests can join.
Even with registration enabled, DO NOT post your zoom.us registration link on social media. Instead:
- Disguise zoom.us URLs using https://bitly.com/ (it’s free!)
- Ask users to visit another page to register for the event, and include that URL instead.
- Avoid using the terms Zoom, Zoom Webinar or Webinar and opt for terms like, “online event”, “online session”, or “virtual session”, to avoid attracting unwanted attention.
Security Step #2: Before Starting Your Meeting
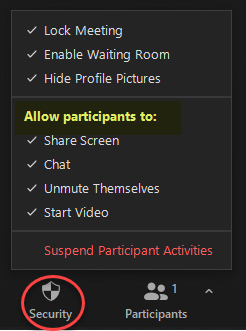
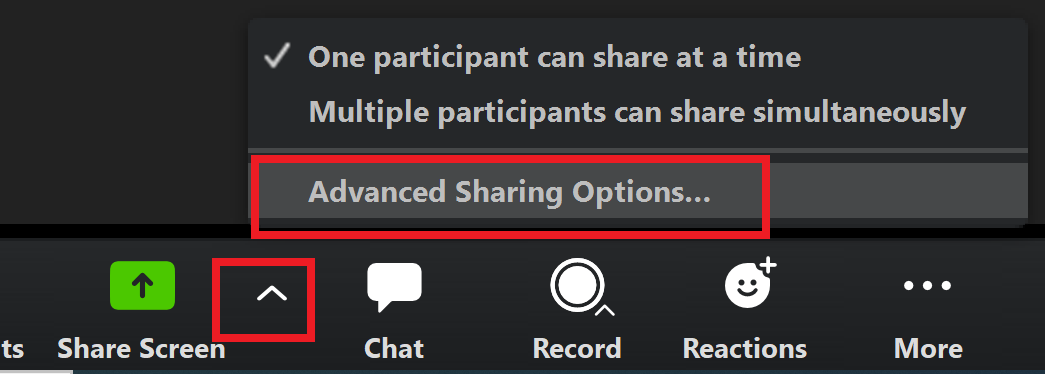
Configure security settings at the start of a meeting and before admitting attendees or participants using the Security and Screen Share buttons.
Below pictured left: the Security menu. Pictured right: the Screen Share menu


Basic Settings:
Education Commons has auto enabled the Waiting Room, but you can choose if you want to Hide Profile Pictures so no attendees (including hosts) will have profile pictures visible.
Participant settings:
Hosts can enable or disable participant audio, video and screen sharing settings, both in-meeting and when initially scheduling.
Screen Sharing options:
Use the Screen Share icon to access the Advanced Sharing Options to select more specific restrictions for screen sharing.
Security Step #3: During Your Meeting
Lock Meeting:
In the Security menu, select Lock Meeting to prevent anyone new from joining the meeting. Existing attendees will not be removed.
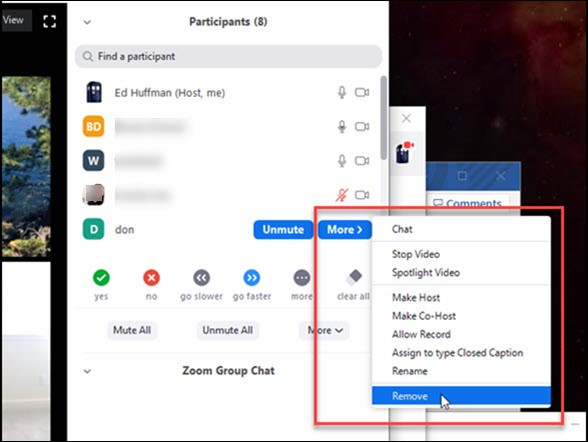
Know how to remove unwanted participants:
From the Participants menu, hosts can mouse over a participant’s name, and several options will appear, including Remove.

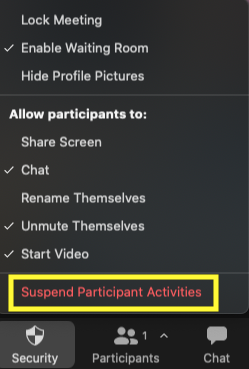
Suspend Participant Activities – final resort only
The Suspend Participant Activities option should be used as a final resort if the meeting is being disrupted. Participants (and some hosts), will lose access to everything, and the main host will be spotlighted.

Additional Support
Online Service Hub
Visit our online service hub to submit a ticket for technical problems, or to make a request for IT support or resources.
Virtual Service & Support
Drop in on Zoom to connect with an Education Commons expert.
Monday to Friday
11:00 AM to 3:00 PM EST
Book a Consultation
Make an appointment to talk with an Education Commons expert at a time that works for you.
